libimobiledevice 笔记 一
版权声明:原创文章,未经授权,请勿转载
libimobiledevice 是一个开源的、跨平台的软件库,用于与 iOS 设备(如iPhone、iPad和iPod Touch)进行通信。libimobiledevice 不依赖于 Apple 的 iTunes 或其他 Apple 软件,允许用户在各种平台上管理iOS设备。
libimobiledevice 在 Mac 上的作用相当于 MobileDevice.framework,而在 Windows 上的作用相当于 AppleMobileDeviceSupport(iTunes 安装包所携带的支持组件 AppleMobileDeviceSupport[x86/x64].msi)。
目前市面上有相当一部分的软件,就采用 libimobiledevice 来实现与 iOS 设备的交互,比如 爱思助手。
官方主页: https://libimobiledevice.org/
官方仓库: https://github.com/libimobiledevice
组件说明
-
idevice
设备对象, 标识一个 iOS 设备 -
idevice_connection
设备连接对象, 与 iOS 设备中某个端口之间的 TCP 连接, 该连接经过 PC 系统服务 usbmuxd 代理转发,其实际链路可能是 USB 电缆, 也可能是 WiFi 局域网. -
lockdownd
一个 iOS 系统服务, 它监听本地端口62078(0xf27e), 用于管理与计算机的连接、会话配对、提供访问其他系统服务信息、设备基本信息的通道。 -
service_client
连接到 iOS 系统服务的通道, 通过该通道可以访问 iOS 系统服务,从服务的角度上看,也可以看作是该系统服务的客户端。 -
property_list_service_client
service_client的扩展,在原基础上增加了plist数据格式收发的业务层。 -
device_link_service_client
property_list_service_client的扩展,在原基础上增加了DLMessage*系列消息的业务层。 -
screenshotr_client
- 一个 iOS 系统服务, 提供屏幕截图的能力。
- 该服务的标识符为
com.apple.mobile.screenshotr。
-
usbmuxd
- 一个 PC 系统服务, 允许在 iOS 设备与 PC 间进行 TCP 通讯, 即在 USB 与 LAN 局域网 的介质上, 通过
usbmuxd与运行在 iOS 设备上应用程序通讯。可以将其理解为一个 VPN, 它将 PC 的网络数据包转发到 iOS 设备。 - 它在
iTunes的组件AppleMobileDeviceSupport中是作为一个名为Apple Mobile Device Service的系统服务。
- 一个 PC 系统服务, 允许在 iOS 设备与 PC 间进行 TCP 通讯, 即在 USB 与 LAN 局域网 的介质上, 通过
-
libusbmuxd
usbmuxd的客户端,应用程序可以使用该组件提供的接口,间接与 iOS 设备通讯。
关于 usbmuxd、libusbmuxd、lockdownd 及其他 iOS 系统服务的关系结构如下:

数据结构关系
libimobiledevice 各组件间具有良好的组织与设计,它在 c 语言的基础上做了 面向对象的 抽象 与 继承。
因此各组件的数据结构经过了层层封装,但也增加了代码的复杂度,理解清楚数据接口的层次关系,对阅读源码大有裨益,关键的数据结构摘录如下:
// idevice
struct idevice_private {
    char *udid;
    uint32_t mux_id;    // usbmuxd handle
    enum idevice_connection_type conn_type;
    void *conn_data;    // usbmuxd conn_data (网络模式时的 NetworkAddress)
    int version;        // 0
};
typedef idevice_private *idevice_t; /**< The device handle. */

// idevice_connection
struct idevice_connection_private {
    idevice_t device;
    enum idevice_connection_type type;
    void *data;             // 文件描述符(socket fd) usbmuxd_connect(device->mux_id, port);
    ssl_data_t ssl_data;    // 默认nullptr
};
typedef idevice_connection_private *idevice_connection_t; /**< The connection handle. */

// iOS 系统服务的客户端
struct service_client_private {
    idevice_connection_t connection;
};
typedef service_client_private* service_client_t; /**< The client handle. */

// property_list_service_client
struct property_list_service_client_private {
    service_client_t parent;
};
typedef property_list_service_private* property_list_service_client_t; /**< The client handle. */

// lockdownd iOS 系统服务的客户端
struct lockdownd_client_private {
    property_list_service_client_t parent;
    int ssl_enabled;        // 默认0
    char *session_id;       // 默认null
    char *udid;
    char *label;            // 任意名称
    uint32_t mux_id;        // 与idevice_t->mux_id 相同
};
typedef lockdownd_client_private *lockdownd_client_t; /**< The client handle. */

// iOS 系统服务 在lockdownd中的描述符
struct lockdownd_service_descriptor {
    uint16_t port;          // 服务端口号
    uint8_t ssl_enabled;    // 是否开启ssl
    char* identifier;       // 服务名称, 如: com.apple.mobile.screenshotr
};
typedef struct lockdownd_service_descriptor *lockdownd_service_descriptor_t;

// device_link_service
struct device_link_service_client_private {
    property_list_service_client_t parent;
};
typedef struct device_link_service_client_private *device_link_service_client_t;

// screenshotr iOS 系统服务的客户端
struct screenshotr_client_private {
    device_link_service_client_t parent;
};
typedef screenshotr_client_private *screenshotr_client_t; /**< The client handle. */
PC & iOS设备 建立通讯连接
根据下图所示, 我们在宏观的角度上看到 iOS 设备从接入 PC 到 PC 中的应用程序与 iOS 设备之间建立通讯连接的过程。
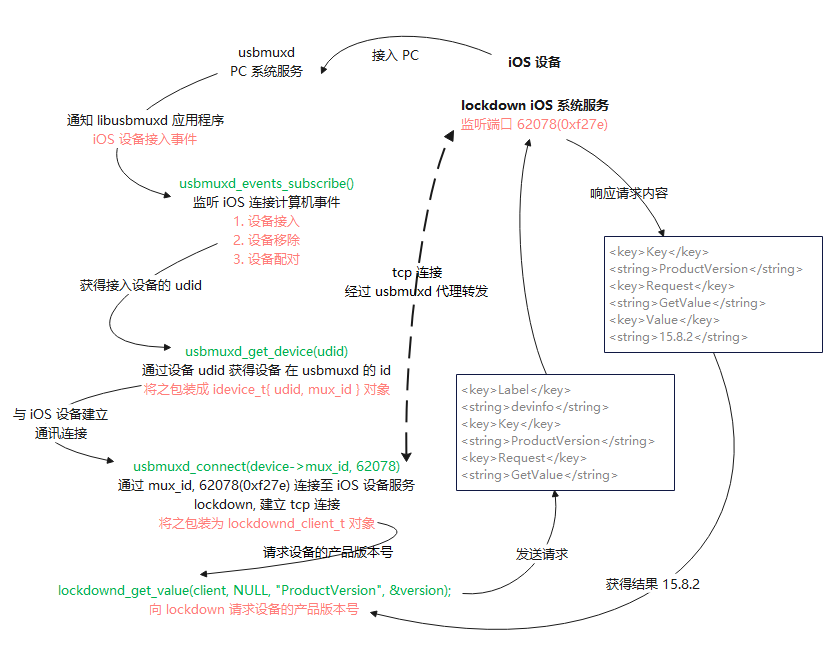
下面是 libimobiledevice 主要的参与这个过程的主要代码脉络,这里简化了许多不必要的步骤。
设备发现过程
这里是可选的监听iOS设备连接事件,主要作用是获取接入设备的 udid,通常也可以直接通过 已知设备的 udid 去 usbmuxd 中查找已连接到 PC 的 iOS 设备。
static char* udid = NULL; // 设备udid

void device_event_cb(const idevice_event_t* event, void* userdata)
{
    event->conn_type;    // 连接类型: CONNECTION_NETWORK, CONNECTION_USBMUXD
    event->udid;         // 设备udid

    switch (event->event) {
        case IDEVICE_DEVICE_ADD:
        udid = strdup(event->udid);
        break;

        case IDEVICE_DEVICE_REMOVE:
        if (udid && !strcmp(udid, event->udid)) {
            free(udid); udid = NULL;
        }
        break;

        case IDEVICE_DEVICE_PAIRED:
        break;
    }
}

// 实际上是对 usbmuxd_events_subscribe() 的包装
idevice_subscription_context_t context = NULL;
idevice_events_subscribe(&context, device_event_cb, NULL);
建立通讯连接
通过 udid 与设备建立通讯连接并完成配对
// 使用 udid 实例化设备对象 idevice_t, 此时还没有与设备建立通讯连接
idevice_t device = NULL;
idevice_new_with_options(&device, udid, IDEVICE_LOOKUP_USBMUX);

// 从 idevice_t 实例化 lockdownd 客户端, 与设备握手, 配对
lockdownd_client_t lckd = NULL;
lockdownd_client_new_with_handshake(device, &lckd, "any label");
idevice_new_with_options() 大概实现:
idevice_error_t idevice_new_with_options(idevice_t * device, const char *udid, enum idevice_options options)
{
    usbmuxd_device_info_t muxdev;
    int res = usbmuxd_get_device(udid, &muxdev, (usbmux_lookup_options)options);
    if (res > 0) {
        *device = idevice_from_mux_device(&muxdev);
        return IDEVICE_E_SUCCESS;
    }
    return IDEVICE_E_NO_DEVICE;
}

idevice_t idevice_from_mux_device(usbmuxd_device_info_t *muxdev)
{
    idevice_t device = (idevice_t)malloc(sizeof(struct idevice_private));
    device->udid = strdup(muxdev->udid);
    device->mux_id = muxdev->handle;
    device->version = 0;
    device->device_class = 0;

    switch (muxdev->conn_type) {
    case CONNECTION_TYPE_USB:
        device->conn_type = CONNECTION_USBMUXD;
        device->conn_data = NULL;
        break;

    case CONNECTION_TYPE_NETWORK:
        device->conn_type = CONNECTION_NETWORK;
        struct sockaddr* saddr = (struct sockaddr*)(muxdev->conn_data);
        size_t addrlen = 0;
        switch (saddr->sa_family) {
            case AF_INET:
                addrlen = sizeof(struct sockaddr_in);
                break;

            case AF_INET6:
                addrlen = sizeof(struct sockaddr_in6);
                break;
        }
        device->conn_data = malloc(addrlen);
        memcpy(device->conn_data, muxdev->conn_data, addrlen);
        break;
    }
    return device;
}
lockdownd_client_new_with_handshake() 大概实现:
lockdownd_error_t lockdownd_client_new_with_handshake(
    idevice_t device, lockdownd_client_t *client, const char *label)
{
    // 以0xf27e端口打开服务
    lockdownd_client_t client_loc = NULL;
    lockdownd_client_new(device, &client_loc, label);

    // 执行握手
    char *type = NULL;
    lockdownd_query_type(client_loc, &type);

    // 设备版本号查询
    if (device->version == 0)
    {
        plist_t p_version = NULL;
        lockdownd_get_value(client_loc, NULL, "ProductVersion", &p_version);

        char *s_version = NULL;
        plist_get_string_val(p_version, &s_version);
        if (s_version && sscanf(s_version, "%d.%d.%d", &vers[0], &vers[1], &vers[2]) >= 2)
            device->version = DEVICE_VERSION(vers[0], vers[1], vers[2]);

        // 清理资源
    }

    // 从usbmuxd读取配对记录
    char *host_id = NULL;
    plist_t pair_record = NULL;
    userpref_read_pair_record(client_loc->udid, &pair_record);

    // 从配对记录中读取host id
    if (pair_record)
        pair_record_get_host_id(pair_record, &host_id);

    if (LOCKDOWN_E_SUCCESS == ret && pair_record && !host_id)
        ret = LOCKDOWN_E_INVALID_CONF;

    // 没有配对记录, 则尝试配对
    // 1. 通过读取设备公钥, 生成配对记录, 证书, 并放入配对记录中
    // 2. 通过usbmuxd读取SystemBUID ?, 并放入配对记录中
    // 3. 生成一个uuid作为host id, 并放入配对记录中
    // 4. 通过配对记录构造请求, 发送至设备, 然后接收响应
    // 5. 将响应中的EscrowBag数据, 及WiFiAddress保存至配对记录中
    // 6. 通过usbmuxd将配对记录保存起来

    if (LOCKDOWN_E_SUCCESS == ret && !pair_record)
        ret = lockdownd_pair(client_loc, NULL);

    pair_record = NULL;

    if (LOCKDOWN_E_SUCCESS == ret)
    {
        // 再次读取配对信息, host id
        if (!host_id)
        {
            userpref_read_pair_record(client_loc->udid, &pair_record);
            if (pair_record)
                pair_record_get_host_id(pair_record, &host_id);
        }

        // 开启会话
        ret = lockdownd_start_session(client_loc, host_id, NULL, NULL);
        if (LOCKDOWN_E_SUCCESS != ret) {
            debug_info("Session opening failed.");
        }
    }
}
建立通讯连接的过程:
// lockdownd_client
lockdownd_error_t lockdownd_client_new(idevice_t device, lockdownd_client_t *client, const char *label)
{
    // lockdownd 是一个iOS设备服务, 其在设备上的端口是固定的
    static struct lockdownd_service_descriptor service = {
        .port = 0xf27e,
        .ssl_enabled = 0
    };

    property_list_service_client_t plistclient = NULL;
    if (property_list_service_client_new(device, (lockdownd_service_descriptor_t)&service, &plistclient) != PROPERTY_LIST_SERVICE_E_SUCCESS) {
        return LOCKDOWN_E_MUX_ERROR;
    }

    lockdownd_client_t client_loc = (lockdownd_client_t) malloc(sizeof(struct lockdownd_client_private));
    client_loc->parent = plistclient;
    client_loc->ssl_enabled = 0;
    client_loc->session_id = NULL;
    client_loc->device = device;
    client_loc->cu_key = NULL;
    client_loc->cu_key_len = 0;

    client_loc->label = label ? strdup(label) : NULL;
    *client = client_loc;
    return LOCKDOWN_E_SUCCESS;
}

// property_list_service
property_list_service_error_t
property_list_service_client_new(idevice_t device, lockdownd_service_descriptor_t service, property_list_service_client_t *client)
{
    service_client_t parent = NULL;
    service_error_t rerr = service_client_new(device, service, &parent);

    /* create client object */
    property_list_service_client_t client_loc = (property_list_service_client_t)malloc(sizeof(struct property_list_service_client_private));
    client_loc->parent = parent;

    /* all done, return success */
    *client = client_loc;
    return PROPERTY_LIST_SERVICE_E_SUCCESS;
}

// service_client
service_error_t service_client_new(idevice_t device, lockdownd_service_descriptor_t service, service_client_t *client)
{
    /* Attempt connection */
    idevice_connection_t connection = NULL;
    if (idevice_connect(device, service->port, &connection) != IDEVICE_E_SUCCESS) {
        return SERVICE_E_MUX_ERROR;
    }

    /* create client object */
    service_client_t client_loc = (service_client_t)malloc(sizeof(struct service_client_private));
    client_loc->connection = connection;

    /* enable SSL if requested */
    if (service->ssl_enabled == 1)
        service_enable_ssl(client_loc);

    /* all done, return success */
    *client = client_loc;
    return SERVICE_E_SUCCESS;
}

// idevice
idevice_error_t idevice_connect(idevice_t device, uint16_t port, idevice_connection_t *connection)
{
    if (device->conn_type == CONNECTION_USBMUXD) {
        int sfd = usbmuxd_connect(device->mux_id, port);
        idevice_connection_t new_connection = (idevice_connection_t)malloc(sizeof(struct idevice_connection_private));
        new_connection->type = CONNECTION_USBMUXD;
        new_connection->data = (void*)(long)sfd;
        new_connection->ssl_data = NULL;
        new_connection->device = device;
        new_connection->ssl_recv_timeout = (unsigned int)-1;
        new_connection->status = IDEVICE_E_SUCCESS;
        *connection = new_connection;
        return IDEVICE_E_SUCCESS;
    }

    if (device->conn_type == CONNECTION_NETWORK) {
        struct sockaddr* saddr = (struct sockaddr*)(device->conn_data);
        char addrtxt[48] = {0};
        socket_addr_to_string(saddr, addrtxt, sizeof(addrtxt));

        int sfd = socket_connect_addr(saddr, port);
        idevice_connection_t new_connection = (idevice_connection_t)malloc(sizeof(struct idevice_connection_private));
        new_connection->type = CONNECTION_NETWORK;
        new_connection->data = (void*)(long)sfd;
        new_connection->ssl_data = NULL;
        new_connection->device = device;
        new_connection->ssl_recv_timeout = (unsigned int)-1;
        *connection = new_connection;
        return IDEVICE_E_SUCCESS;
    }
    return IDEVICE_E_UNKNOWN_ERROR;
}
开启服务的过程
开启服务实际上就是与 iOS 设备建立通讯连接,这样就可以直接请求目标服务提供的功能了。
开启服务的过程, 其实与上面建立通讯连接的过程类似, 只是需要先从 lockdownd 中查询目标服务在设备中监听的端口号与SSL选项。
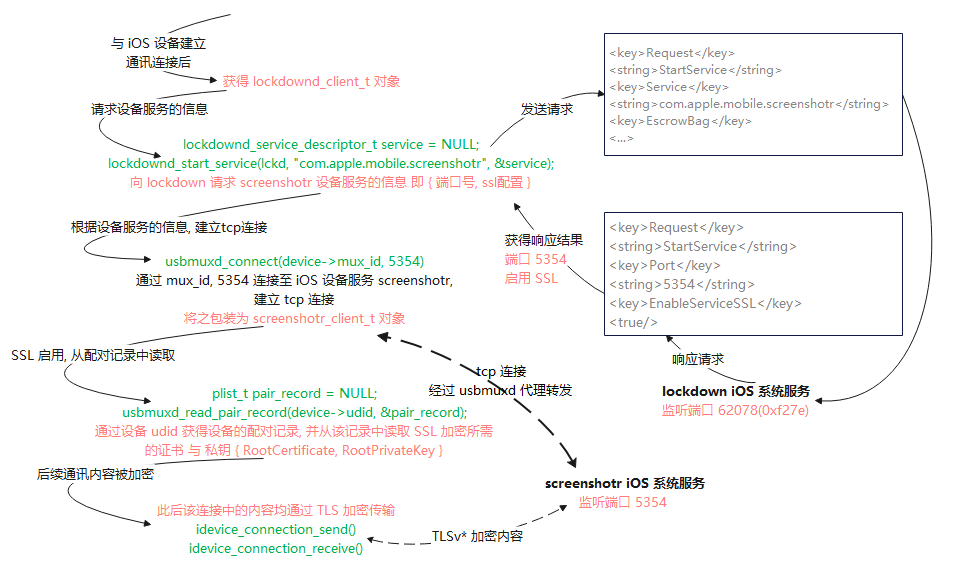
下面是开启服务的主要代码:
// 连接设备, 略...

// 通过lockdownd服务, 打开指定服务并获得端口号, 是否开启ssl
lockdownd_service_descriptor_t service = NULL;
lockdownd_start_service(lckd, "com.apple.mobile.screenshotr", &service);

// 通过服务描述信息实例化服务
screenshotr_client_t shotr = NULL;
screenshotr_client_new(device, service, &shotr);
lockdownd_start_service()大概实现:
lockdownd_error_t lockdownd_start_service(
    lockdownd_client_t client, const char *identifier, lockdownd_service_descriptor_t *service)
{
    return lockdownd_do_start_service(client, identifier, 0, service);
}

static lockdownd_error_t lockdownd_do_start_service(
    lockdownd_client_t client, const char *identifier, int send_escrow_bag, lockdownd_service_descriptor_t *service)
{
    plist_t dict = plist_new_dict();

    /* create the basic request params */
    plist_dict_add_label(dict, client->label);
    plist_dict_set_item(dict, "Request", plist_new_string("StartService"));
    plist_dict_set_item(dict, "Service", plist_new_string(identifier));

    /* if needed - get the escrow bag for the device and send it with the request */
    if (send_escrow_bag) {
        /* get the pairing record */
        plist_t pair_record = NULL;
        userpref_error_t uerr = userpref_read_pair_record(client->device->udid, &pair_record);
        plist_t escrow_bag = plist_dict_get_item(pair_record, USERPREF_ESCROW_BAG_KEY);
        plist_dict_set_item(dict, USERPREF_ESCROW_BAG_KEY, plist_copy(escrow_bag));
    }

    // 发送请求
    property_list_service_send_xml_plist(client->parent, &dict);

    // 接收响应
    property_list_service_receive_plist(client->parent, &dict);

    // 校验响应消息中包含:
    // "Request"            -> "StartService"
    // "Result"             -> "Success" 或 "Failure"
    // "Error"              -> "错误信息"
    // "Port"               -> "服务端口号"
    // "EnableServiceSSL"   -> "是否开启ssl"

    (*service)->port        = dict["Port"];
    (*service)->ssl_enabled = dict["EnableServiceSSL"];
}
screenshotr_client_new() 大概实现:
... screenshotr_client_new(
idevice_t device, lockdownd_service_descriptor_t service, screenshotr_client_t * client)
{
    // 实例化device_link_service
    device_link_service_client_t dlclient = NULL;
    device_link_service_client_new(device, service, &dlclient)

    screenshotr_client_t client_loc = (screenshotr_client_t) malloc(sizeof(struct screenshotr_client_private));
    client_loc->parent = dlclient;

    // 执行握手流程
    device_link_service_version_exchange(dlclient, SCREENSHOTR_VERSION_INT1, SCREENSHOTR_VERSION_INT2);

    *client = client_loc;
}

// device_link_service
... device_link_service_client_new(
idevice_t device, lockdownd_service_descriptor_t service, device_link_service_client_t *client)
{
    property_list_service_client_t plistclient = NULL;
    property_list_service_client_new(device, service, &plistclient);

    device_link_service_client_t client_loc = (device_link_service_client_t) malloc(sizeof(struct device_link_service_client_private));
    client_loc->parent = plistclient;

    /* all done, return success */
    *client = client_loc;
}
libusbmuxd API
这里不再赘述介绍, 仅列举应用程序主要使用的几个 API 接口及说明:
具体参考: https://github.com/libimobiledevice/libusbmuxd/blob/master/include/usbmuxd.h
// 监听设备事件 (添加, 移除, 配对), 并获得 usbmuxd 设备对象
int usbmuxd_events_subscribe(usbmuxd_subscription_context_t *context,
                             usbmuxd_event_cb_t callback, void *user_data);

// 直接获得 usbmuxd 设备对象列表
int usbmuxd_get_device_list(usbmuxd_device_info_t **device_list);

// 通过设备 udid 获得 usbmuxd设备对象
int usbmuxd_get_device_by_udid(const char *udid, usbmuxd_device_info_t *device);

// 通过 usbmux_device_info_t::handle (mux_id) 与设备服务的端口号, 建立连接,
// 返回 tcp 连接的文件描述符 socket sfd;
int usbmuxd_connect(const uint32_t handle, const unsigned short tcp_port);
int usbmuxd_disconnect(int sfd);

// 在指定的 sfd 文件描述符上进行收发数据
int usbmuxd_send(int sfd, const char *data, uint32_t len, uint32_t *sent_bytes);
int usbmuxd_recv(int sfd, char *data, uint32_t len, uint32_t *recv_bytes);
如何构建 Windows 平台的二进制
虽然官方代码适配了 Windows 平台, 但需要在 MSYS2 或 Cygwin 下构建,不能直接使用 Visual Studio 编译。
在这里笔者提供了一个 MSVC 平台的构建方案,为 libimobiledevice 添加了 CMake 的构建脚本,以及编译好的二进制文件,方便开发者直接使用。
代码的仓库地址: https://github.com/ZeroKwok/libimobiledevice-win32-patchs
Comments ()